Monday 21 May 2012

Review - Meadham Kirchhoff SS12 Nail Rock Wraps


The eccentric London based designers Edward Meadham and Benjamin Kirchhoff created an amazing dramatical SS12 show at the end of last year. It was all in all pantomime fashion at its best, where the teddy bear and heart covered designs were matched with with crazy dancing, and extraordinary neon and pastel face and hair paints. The colour explosion that is Meadham kirchhoff was destined to be translated into nail art, and this is exactly what Nail Rock made happen. The models all wore nail wraps especially designed for the show, which included teddy bears, dolls and animals. 

Luckily, these nail wraps are now available for all in the Topshop stores and here at ASOS.


The pack:


The pack comes with a nail wipe to prep the nails, a cuticle stick and a nail file. Instruction on how to apply the wraps are also included in the pack.


The results:


Review:

I bought the nail wraps a couple of weeks ago now, and I have been so excited to finally be able to use them. I absolutely love Meadham Kirchhoff, therefore I also love the Nail Rock designs immensely as they are just such a genius, simple idea. However, the thick wraps are quite difficult to smooth over the nail, especially around the edges. You can see in the photographs above that there are quite a few bumpy bits. I bought them for £7.50 in Topshop which I did find quite steep, especially being a penniless student. Next time I think I will leave the creativity to myself and have a play around with some Meadham Kirchhoff inspired nail art. x


Guest Post by Si Tuong - Giles for New Look Nail Wraps


The lovely Si Tuong from Situonglovestea recently had her nails adorned with the beautifully patterned nail wraps Gold by Giles Deacon at the New Look A/W12 press day. I thought that it would be great to get a review of the nail wraps from Si, and a little sneak peak of what New Look has to offer us over the dreary winter months.


Si - 'With such a range of different prints and patterns to choose from, I couldn’t resist. They’re easy to apply- literally stick them on top of softly buffed nails and then file and cut the wraps to shape. And the best thing is no need for drying time! (I always tend to smudge my nails due to my lack of patience!)'


Keep your eyes peeled to see the full collection hit the shops for A/W12! x 

How to Master... Ombre Crackle Nails


I have been wanting to try out ombre nails for a while now, and overall, this is the easiest tutorial I have done for this blog! To add some interest to this type of nail, I decided to create a crackle version, which is really easy to do. I was inspired by tropical oranges, pinks and yellows during this tutorial, I think that these shades came from my hatred of the English summertime weather at the moment.


You will need:


- Clear varnish
- Sponge
- Yellow varnish
- Pink varnish
- Barry M Instant Crackle in White


How to:


Remember to paint a layer of clear before you use the yellow, this will prevent your nails from staining! Apply another layer once the crackle is dry, to lock in all layers of nail varnish and prevent the nails from chipping.


The result:


The actual final photograph does not look as great as the nails do in real life, the colours actually compliment each other greatly. You can experiment with other colours and combinations too! How about aqua blue and turquoise with a black crackle over the top, the possibilities really 
are endless! x


Thursday 17 May 2012

Diamond Jubilee Nails


As i'm sure the whole country is aware, this year seems to be the ultimate year where we can really celebrate our Britishness (if that's a word) with a good old cup of tea and a digestive biccie or two. However, as I am one who takes any opportunity I can to adorn the nails, a great friend of mine, Katy, and myself decided to create some jubilee inspired nails. We used the classic british colours, red, white and blue. A much more fun way to celebrate in our eyes! 

This photograph does not to the red nail varnish pictured justice, it is by China Glaze in shade 182 Ruby Pumps. The juicy red colour, paired with the extremely dazzling glitter creates an amazing, dramatic effect. Quality nail varnish which would compliment any evening outfit! 


To see how to master the British flag nail, click here. x

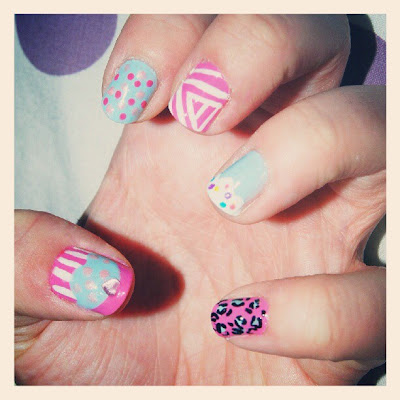
Cute Cupcake Nails

Yesterday I did Sophie's nails, from Tru Violet. She wanted cute, girly nails which represented herself and her love for all things cupcake related! Take a look at her post about the nails here.


What other foodie inspired nails would you like to see? x


Friday 11 May 2012

How To Master... Psychedelic 90's Nails


(Unknown, POP magazine, Bitching and Junkfood, unknown, religioushipsters.tumblr.com, Lily Cole by Tim Walker for Vogue UK)


I am completely inspired by the popularity of all things hippified at the moment. These nails were born out of that love, and the fact that I am a nineties child.


You will need:

-LOTS OF COLOURS
-Some nibbed nail pens
-Clear varnish 
- A sponge


How to:

For this tutorial, every single nail is different. It is up to you how much you mix and match your nails. If you wanted to keep them more simple, you could paint all nails with your favourite colour, and just add some nail art to one accent nail - the possibilities are endless! Below shows you how to complete 4 of the more difficult nails, the others are more self explanatory! How to master the galaxy nail can be seen here. Remember to start with painting a clear base coat of varnish.


The result:


I hope you like! Please do not let the difficult appearance of these nails put you off! You can always try out one or two of the nails and see how it goes. Please do let me know how you get along!

Tuesday 8 May 2012

Review/How To - Primark Ooh La La Nail Foils


Over the bank holiday weekend, I took a stroll into town where I found these nail foils unsuspectedly placed in the corner of the local Primark. This just goes to show how big nail art really has become! The shiny gold colour of the foils caught my eye, and I thought it silly not to try them. In the past I have used other similar nail foils, such as these  Nail Rock wraps, however they're almost 7 times the price, the £1 Primark foils just had to be tried out.


You will need:


-Primark Nail Foils, 
-Clear varnish
-Colour of your choice (Deep red/purple works best)
-Gold glitter


How To:


1) Start by painting all nails, except the thumb and ring finger, with a layer of clear varnish. Then paint a layer of the deep purple colour varnish.

2)The apply the foils to the thumb and ring finger. There are plenty of foil sizes to choose from. Smooth down the foils, then file off the excess.

3) Paint another layer of clear varnish over the painted nails


You can leave your nails like this if you prefer, or you could always use a foil on each of the nails for a more intense look.


If you wish to make your nails even more jazzy:


4) While the clear varnish is still slightly wet, dab on some glitter, focusing on the end of the nail. Apply less glitter as you reach towards the bottom of the nail bed, giving a gradual look.

5) Paint a final coat of clear varnish to keep the glitter in place.


Result:


Layer up some gold jewellery to enhance the nails. Gold will never go out of fashion, so why not embrace it! I chose a Kat & Bee ring, an Urban Outfitters bracelet and a Casio watch.


Review of Primark Ooh La La Nail Foils:

For a mere £1, I think the nail foils are brilliant! They are quick and easy to apply, even for the less confident nail artist! However, they are thin and not the best quality, especially when compared to the Nail Rock wraps. However, at such a small a fraction of the price, who cares! If you're wanting to add some vibrancy and a splash of luxury into your look, these are the nail foils for you. Even if they do only last one night!